
Showing all 2 resultsSorted by latest
-
ANALOG DEVICES ADM 717x-EVAL Evaluation Boards
$70.00Analog Devices ADM717 EVAL BD
Analog Devices Inc. ADM7172CP-EVALZ Evaluation Board helps designers evaluate the functionality of the ADM7172 linear regulators. ADM7172CP-EVALZ can provide simple device measurements, such as line and load regulation, dropout, and ground current with just a single voltage source, a voltmeter, an ammeter, and load resistors.
- 2.3V to 6.5V Input voltage range
- 0mA to 2A Output current range
- −0.5%/+1% Output voltage accuracy
- -40°C to +125°C Operating temperature range
- Output voltage can also be adjusted up with two external resistors from any fixed output voltage option
- VOUT = VOUT(FIXED) × (1 + R1/R2)
-
Gumstix Overo and Tobiwo 27950 GS3503T-R2889
$150.00Gumstix Overo and Tobiwo 27950 GS3503T-R2889
The typical Gumstix configuration consists of a computer-on-module or COM and an expansion board.
- The expansion board can be off-the-shelf from Gumstix or custom made. Gumstix openly publishes the schematics of all off-the-shelf expansion boards to assist rapid development of custom solutions.
- For some applications, a camera board can be connected to the top of the Overo COM via a ribbon cable.
- A typical Verdex Pro assembly consists of a Verdex Pro COM sandwiched between a 60-pin expansion board and an 80-pin expansion board.
The DuoVero COM, Overo COM and Verdex Pro COMs are unique to Gumstix.
The following information addresses the most common expansion options: a DuoVero COM with Parlor expansion board, an Overo COM mounted on a Tobi expansion board, and a Verdex Pro COM mounted on a Console-VX expansion board.
Overo and Tobi
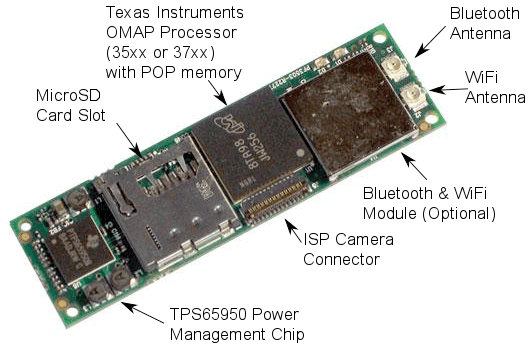
Gumstix Overo 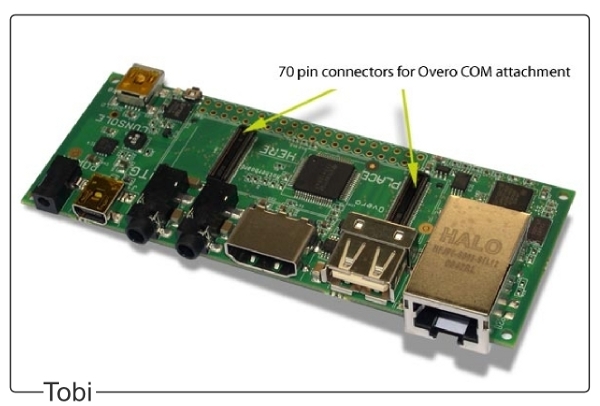
Gumstix Tobi An Overo COM connects to an Overo series expansion board via the two 70-pin AVX connectors located on the bottom side of the COM. Place the Tobi board on a flat, static-safe surface, align the COM with the white outline on the board above the connectors and gently press on the COM until it clicks into place.


